


With Clerk it takes around 5 minutes to enable user management for your NextJS application.
But what if you use a custom backend on AWS because the API provided by NextJS does not fit your needs? How do you verify the requests sent from the UI?
Clerk states in their docs:
A request is considered “authenticated” when the backend can securely identify which user and which device is making the request.
So let's have a look at how to implement this end-to-end. After setting up Clerk for our NextJS application (see here how) we now need to find out how to attach the session token to our requests and then verify them on our AWS hosted backend.
For that, we use SST and their API construct to set up an API Gateway. Things we need to take into account:
- it is a cross-origin request e.g. the UI is hosted on test.dev and our API on api.test.dev. Cookies are used for same-origin requests, for cross-origin the token is attached to the request authorization header.
To enable the token attachment we write a simple wrapper around fetch or react-query. As I am a big fan of the latter here is an example:
import { useQuery } from 'react-query';
import { useAuth } from '@clerk/nextjs';

export default function useAuthenticatedQuery<T>(url) {
  const { getToken } = useAuth();
  return useQuery<T>(url, async () => {
    const res = await fetch(url, {
      headers: { authorization: `Bearer ${await getToken()}` }
    });
    if (!res.ok) {
      throw new Error('Network response error')
    }
    return res.json()
  });
}
and voila: now every request contains a proper authorization token.

But how can we now verify this token on our backend? The answer is to use a JWTAuthorizer. There are various options to use authorizers for your API Gateway with their pros and cons. This time we have a look at this authorizer as we only want to check if the token passed is valid. The authorizer does this by:
extracting and decoding the token from the header
checking the token's algorithm and signature by using the public key that is fetched from the issuer's
jwks_urivalidating default claims
attaching the validated claims to the API integration e.g. to the lambda context
With SST this is quite simple:
import { StackContext, Api } from "sst/constructs";

export function API({ stack, app }: StackContext) {
  const api = new Api(stack, "api", {
    defaults: {
      authorizer: 'JwtAuthorizer'
    },
    authorizers: {
      JwtAuthorizer: {
        type: "jwt",
        identitySource: ["$request.header.authorization"],
        jwt: {
          audience: ['test'], // <-- your custom aud claim
          issuer: 'https://...' // <-- your clerk issuer value
        }
      },
    },
    cors: {
      allowOrigins: allowedOrigins,
    },
    routes: {
      "GET /test": "packages/functions/src/test.list",
    },
  });
}
Two steps are necessary to make this authorizer work:
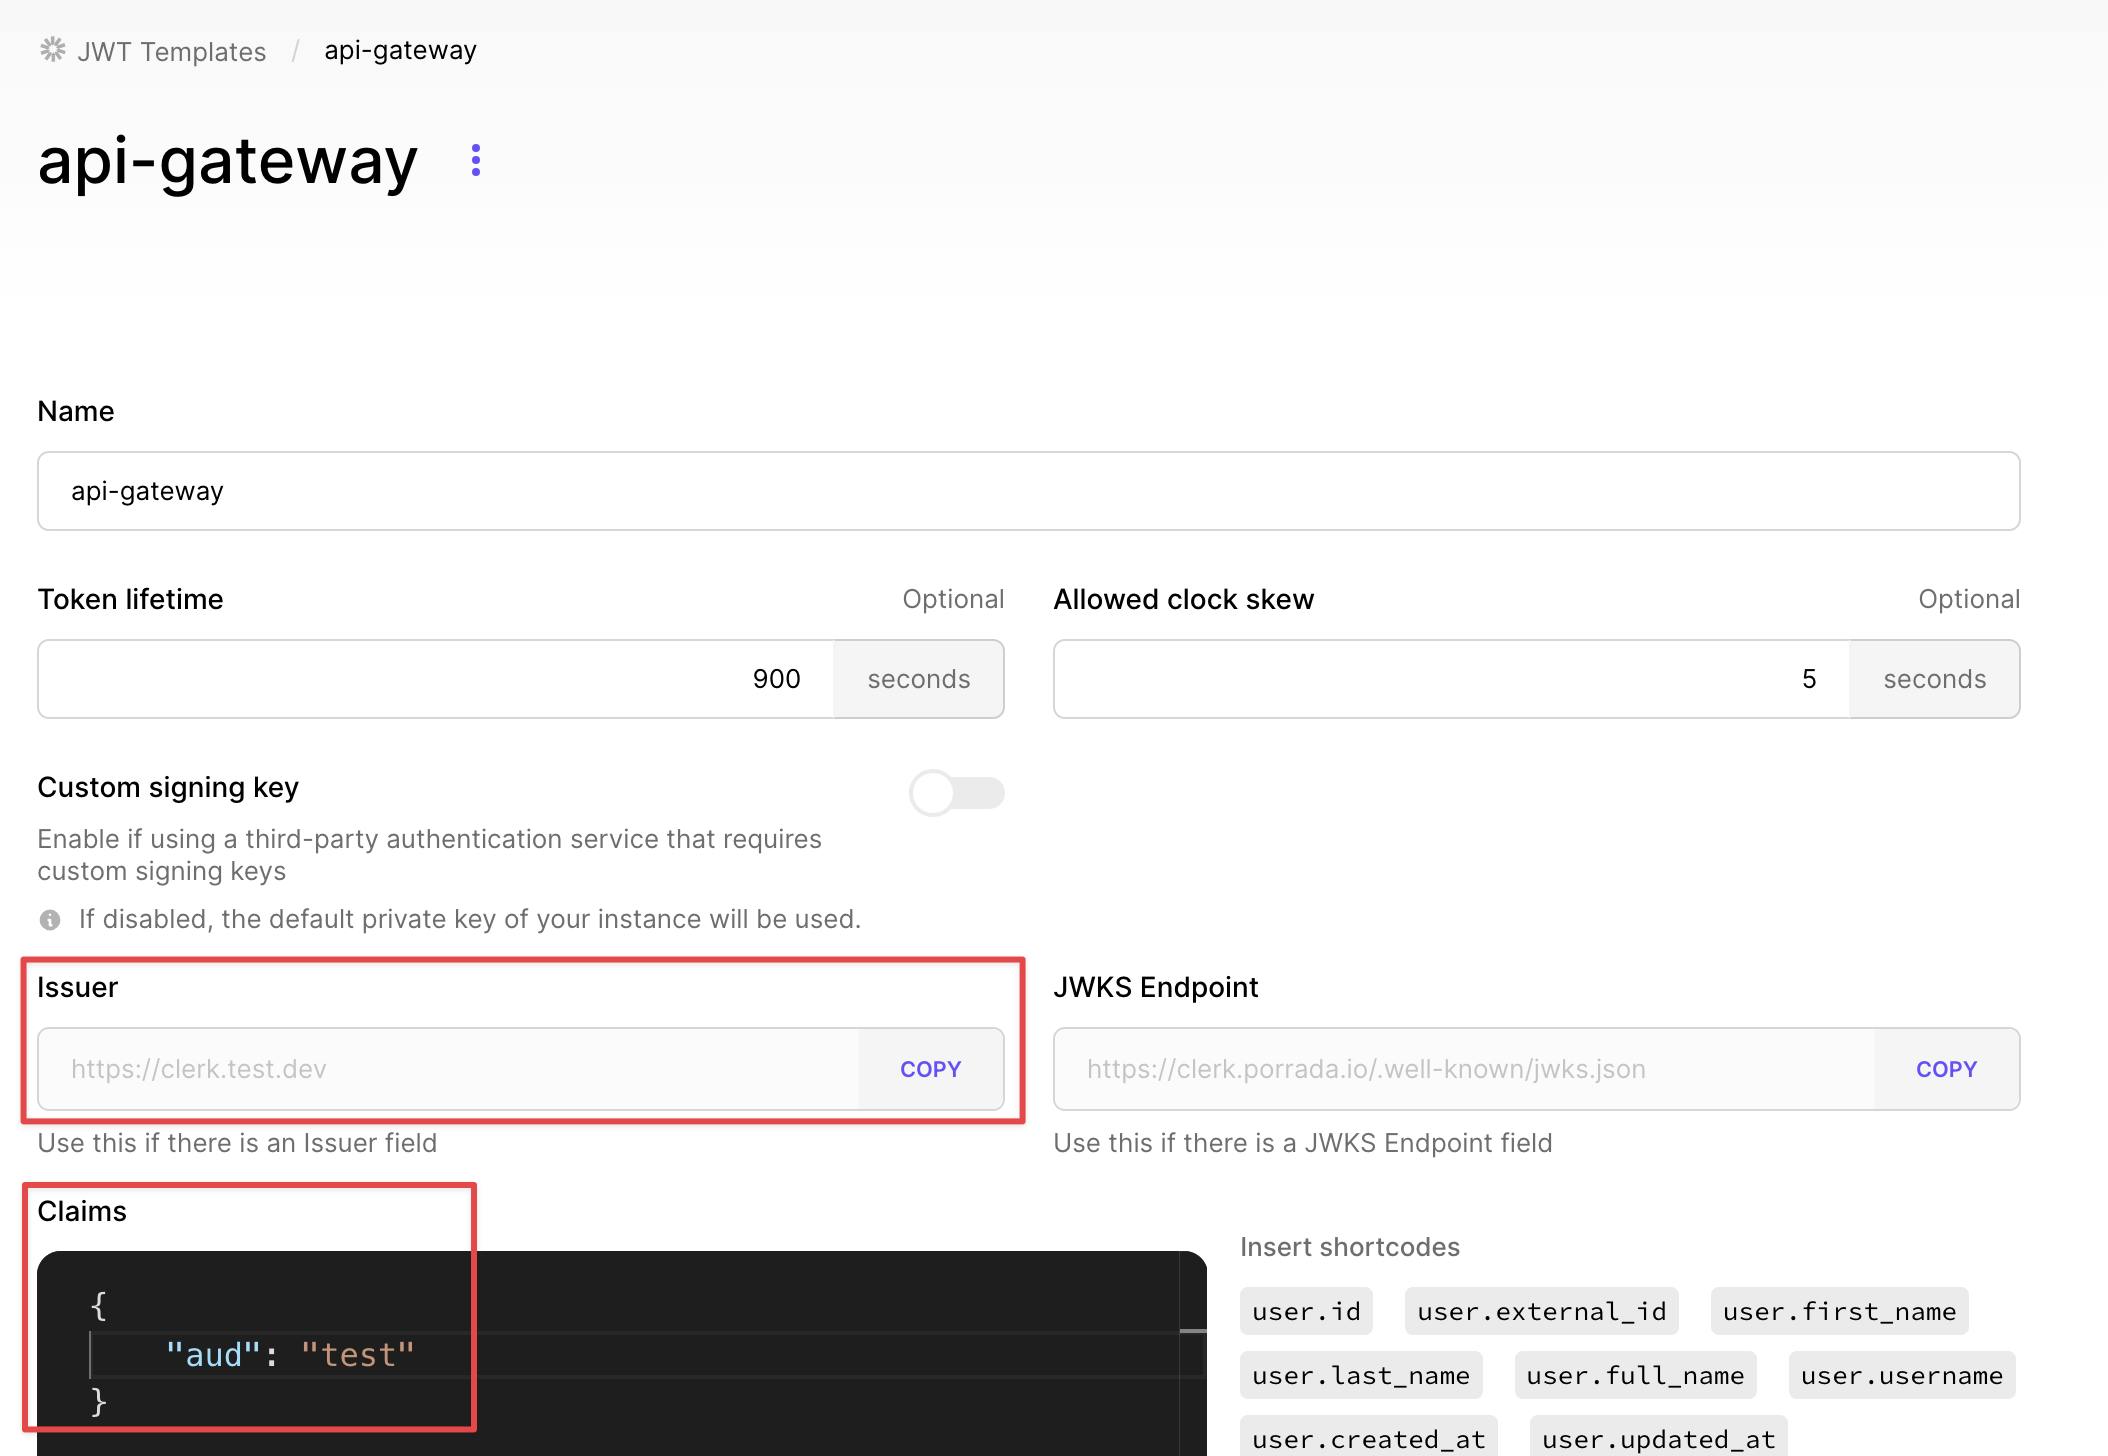
adding a custom JWT template to Clerk with a custom aud claim. Go to your dashboard and click JWT Templates. Create a blank one and name it however you like. Under Claims add the following and apply your changes. You can name this claim however you'd like. Take the aud and issuer values and replace them in the previous code SST API code snippet.
This newly created template must be used in the UI to create this custom JWT template. You do this by slightly modifying the react-query wrapper mentioned above. See how we change the parameters of the getToken method to take the new template.
        export function useAuthenticatedQuery<T>(query: UseAuthQueryTypes) {
          const { getToken } = useAuth();
          return useQuery<T>({
            queryKey: [query.options.queryKey, query.path],
            queryFn: async () => {
              const res = await fetch(`${config.API_ENDPOINT}${query.path}`, {
                headers: { authorization: `Bearer ${await getToken({ template: 'api-gateway' })}`, accept: 'application/json' }
              });
              if (!res.ok) {
                throw new Error('Network response error')
              }
              const json = await res.json();
              return json.body
          }
         });
        }
You can verify that the new template is used by taking the bearer token and pasting it into https://jwt.io/.
And that's it. Every request is now being verified by the authorizer. The claims are attached to the API integration request under event.requestContext.authorizer.jwt.claims
Bonus: Attach claims to async storage to retrieve them throughout your lambda request lifetime
You can write a middy middleware that runs before your lambda function and stores the necessary claims in an AsyncStorage, this is cool because you don't need to pass them around as function parameters.
import { AsyncLocalStorage } from "async_hooks";

export const userStorage = new AsyncLocalStorage();

export const useUser = () => {
    return userStorage.getStore() as string | undefined;
}

export const withUserStoredInContext = () => {
  return {
    before: (handler: middy.Request<APIGatewayProxyEventV2WithJWTAuthorizer>) => {
      const { sub } = handler.event.requestContext.authorizer.jwt.claims
      if(!sub) throw new Error('Could not find user id in JWT')
      userStorage.enterWith(sub)
    }
  }
}
Wrap your SST function with the middleware:
import { NewTechniqueSchema } from '@porradaio/core/utils/validator';
import { ApiHandler, useBody } from 'sst/node/api';
import { withMiddlewares } from "./middleware";
import { replyJSON } from './utils';


export const create = withMiddlewares(ApiHandler(async () => {
  const body = useBody();
  const validatedTechnique = NewTechniqueSchema.safeParse(JSON.parse(body || ""))

  if (!validatedTechnique.success) {
    return replyJSON({
      status: 400,
      body: {
        message: validatedTechnique.error.message
      }
    })
  }
  await Technique.create(validatedTechnique.data)

  return replyJSON({
    status: 201
  });
}));
You can fetch the user context through the lambda request lifetime by simply calling the useUser hook wherever you want.
import { useUser } from '@porradaio/functions/src/utils'

export const remove = async (id: string) => {
    const userId = useUser()

    if(!userId) return;

    await removeJournal({ journalId: parseInt(id), userId: userId })
}